
Customer Maintenance (Alt-M) (Advanced Feature)
Customer Maintenance screen is where you can Add a New Customer, Find and Update an existing Customer, and Delete a Customer.
Customer Maintenance Toolbar

With shortcut Button Toolbar keys you can access some of the most needed Customer Maintenance options as below
 New Customer
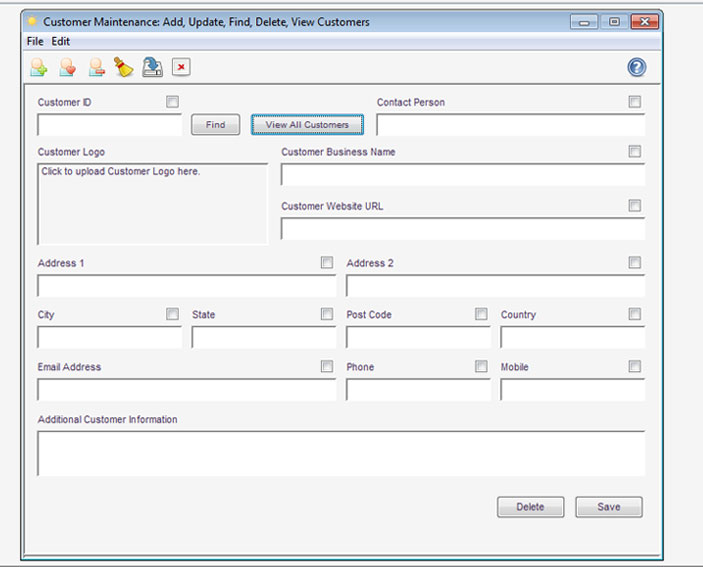
- New Customer button takes you to the clear Main Screen (image 1) for adding a New Customer details with maximum of 15 fields.
- A New Customer must have a unique Customer ID, that means you can not save a Customer if you do not enter a unique Customer ID.
- If you enter a Customer ID that has already exist in the system, all the Customer details for that Customer ID will be displayed for Update.
- Other fields values are optional and can be left with spaces.
- Above all text boxes beside Additional Customer Information and Customer Logo there is a Checkbox (image 1). You can set a Contact Address for a Customer to be displayed in any of 20 invoices by selecting each field check box for that field to be added to Customer address. (click here for example)
- Click Save to add a Customer to the Customer file.
 Update Customer
- Update Customer button takes you to the clear Main Screen (image 1) above.
- To update a Customer, enter a Customer ID and click Find button or press Tab to display details of an existing Customer for Update.
- if you do not know the Customer ID, you can also select a Customer for Update by clicking
View All Customer button to see
View, Update, Print Customers Screen (image 3). Then select a Customer and press
Update Icon in Toolbar to get back to Update Customer screen to do changes for this particular Customer. - Click Save button to save changes for this Customer.

 Delete Customer
- Delete Customer button ask for Confirmation to delete a Customer.
- You need to display details of a Customer in Screen by typing a Customer ID or select a Customer using
View All Customer button and then press
Delete Icon in Toolbar to Delete that Customer.
 Clear Screen
- Clear Screen will make Screen ready for next option
 Save Customer
- Save Customer will save a Customer details in the customerdata.txt
 Close
Close
- Close will close the Screen
You also can find all of the Toolbar Options in File and Edit Menu Items too.
Customer ID: CUST001, Customer Business Name: ZXY Business, Address 1: Unit 15 , Address 2: 123 Power Ave, City: Melbourne, State: Victoria, Post Code: 3000
and you prefer when you invoice this Customer only Customer Business Name, City, and State to be written in Customer Address box of your selected invoice. To achieve this objective you need to tick Checkboxes above Customer Business Name, City, and State text boxes.
When you invoice this Customer and use the Select Button next to the Customer Address and then you click Display button when you back to your Invoice Select A Customer to Invoice, you will have below text in your Customer Address box.
ZXY Business
Melbourne Victoria